Creating Custom link in Site Setting and Site Action menu using JSOM

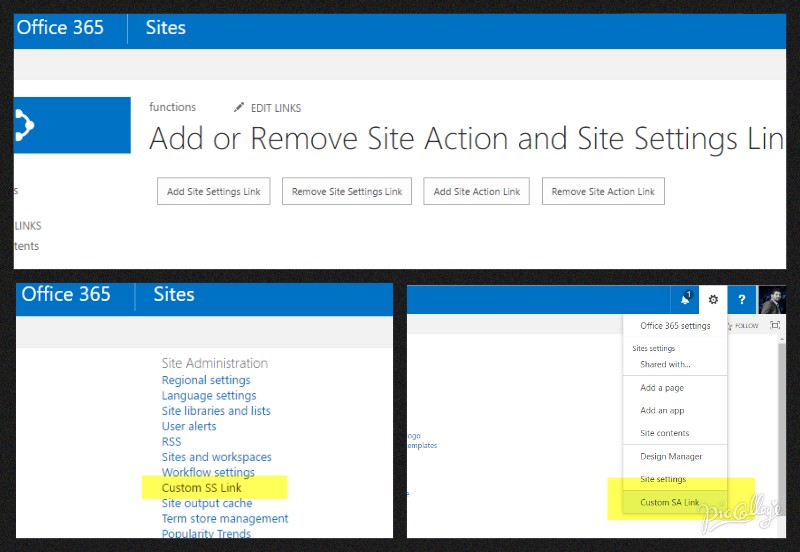
Here we are going to see how to add custom Site Action and Site Settings links in SharePoint Online, same code can be used for SharePoint 2013 and 2016. It’s very useful to provide our custom application navigation link in site action and custom application setting link Under site setting. This application provides easy user interaction.

cover 01

I have used custom page layout for developing this application and I used JSOM. If you are not familiar creating custom page layout, Check my previous post SharePoint custom page layout  .

In general, we have to use user custom action object to create link in site settings or site action menu. In that we have to pass the location and the group ID as a parameter, in the below table we can find out the all locations and group IDs for other possibilities.

list if group IDs

Sequence parameter will define top or bottom of the another link; Ex, 100 Sequence will place our link in the next to 99 Sequence link
Removing our custom link is very simple, we just have to loop all the custom links and filter the link based on link title, then we can remove the link object.

Adding custom link in site settings


var collUserCustomAction = web.get_userCustomActions();

var userCA = collUserCustomAction.add();
userCA.set_location('Microsoft.SharePoint.SiteSettings');
userCA.set_group("SiteAdministration");
userCA.set_sequence(100);
userCA.set_title('Custom SS Link');
userCA.set_url('http://www.google.com');
userCA.update();

clientContext.executeQueryAsync(function () {
console.clear();
console.log("Site settings link added");
}, OnFailure);

Adding custom link in site action menu


var collUserCustomAction = web.get_userCustomActions();

var userCA = collUserCustomAction.add();
userCA.set_location('Microsoft.SharePoint.StandardMenu');
userCA.set_group("SiteActions");
userCA.set_sequence(100);
userCA.set_description('Menu item added via ECMAScript');
userCA.set_title('Custom SA Link');
userCA.set_url('http://www.google.com');
userCA.update();

clientContext.executeQueryAsync(function () {
console.clear();
console.log("Site action link added");
}, OnFailure);

Removing custom link based on the link title


function removeCustomAction(title) {
var collUserCustomAction = web.get_userCustomActions();
clientContext.load(collUserCustomAction);
clientContext.executeQueryAsync(function () {
var item = collUserCustomAction.getEnumerator();
while (item.moveNext()) {
var currAction = item.get_current();
if (currAction.get_title() === title) {
currAction.deleteObject();
clientContext.load(currAction);
clientContext.executeQueryAsync(function () {
console.clear();
console.log(currAction.get_title() + " link removed");
}, OnFailure);
break;
}
}
}, OnFailure);
}

Please feel free to let me know if you have any queries in the comment section, I’m happy to help you!!

Happy coding!!

Create custom page layout in SharePoint Online

This post will explain about creating new page layout for SharePoint Online, same logic is  applicable for SharePoint 2013 and 2016.

Custom page layout can be used in SharePoint publishing site or Publishing feature enabled sites. Custom page layout can be used in SharePoint default master page or our custom master page,

SharePoint page layout sections

check my previous post about how to create custom master page for SharePoint
Navigate to SharePoint design manager and click Edit Page Layout link then click Create a page layout, in the popup enter new layout name and select master page and select existing SharePoint default content type or create new content type based on your requirement, you can find the create new content type link on the same popup.

SharePoint new page layout popup
Once the page layout is  created, open SharePoint Designer 2013 and open site on that. On the left side of SharePoint Designer select layout and you can find newly created layout files, there will be two files in same name one is HTML and another one is ASPX extension.
Check out the newly created page layout (HTML extension) and right click and select Edit File in Advanced Mode option.

SharePoint designer layouts

Once page layout opened then find out ContentPlaceHolder ID of “PlaceHolderMain”, clear all div elements inside the place holder and paste your page layout HTML or prepare your HTML inside.
If you created custom master page using HTML template conversion logic, then you have to cut center content(layout content) from master page and paste in this page layout.
Navigate to site home page and edit the page and select page tab, in that tab open page layout drop down and select our new layout.

And now your new page layout is ready..!!

Please feel free to let me know if you have any queries in the comment section, I’m happy to help you!!

Happy coding!!

Create custom master page for SharePoint Online

This post will explain about creating new master page for SharePoint Online, same logic is applicable for SharePoint 2013 and 2016.

There are various ways we can create custom master page for SharePoint, here I’m going to convert bootstrap HTML template to SharePoint mater page, hope you know that the bootstrap templates can change design based on the screen size, so these templates design are called responsive design.


You can download any HTML template from web; you will can zipped file then extract all files,

HTML Template files
Navigate to SharePoint admin center https://<tenant name>-admin.sharepoint.com

In the site collection tab click new and select Private or Public site collection

New Site Collection ButtonFill all the required details and select Publishing Portal template under Publishing tab

Create new publishing site
Once the site collection is created, open the site in the browser and SharePoint Designer 2013.
Once site is opened in the SharePoint Designer 2013, navigate to All files  _catalogs  masterpage

Master Page Directry
And copy and paste all the downloaded html template files like image, css, script folders and HTML file etc,.
Go back to the browser and click the gear button which is located on top right of the SharePoint page and select Design Manager.

Design Manager Link
On the design manager click edit master pages and click “Convert an HTML file to a SharePoint master page”

SharePoint Disign Manager Master page
On the dialog popup select you pasted HTML page and click Insert

now open SharePoint designer 2013 and find the newly created master page, you can find two files, in that edit the HTML extension and remove the center content(layout section contents) and find below highlighted code and cut and paste into the layout section.

layout section
Then publish the newly added master page in Design Manager or SharePoint design manager

Publishing Master Page
After publishing, go to the site settings and click master pages link under look on feel, select newly added master page in site master page drop down list and click OK to apply the new master page.

Select Master Page

And to finish it off  you will need to create a page layout and we are done!!

To create the page layout for the center content please click the below link and go ahead.

we have to create page layout for centre content which we removed from master page, check this URL for How to create SharePoint Page layout. 

Please feel free to let me know if you have any queries in the comments section,I’m happy to help you!!

Happy coding!!