Hi. Can you please check your code. I’ve created this without errors and it only produces a thin box with only a Description Field. There is no Rich Text Control and no Save button displays
What to check if we can change default font – family and size of text within richtext from properties. I want to add “Arial” as my default font for text in richtext.
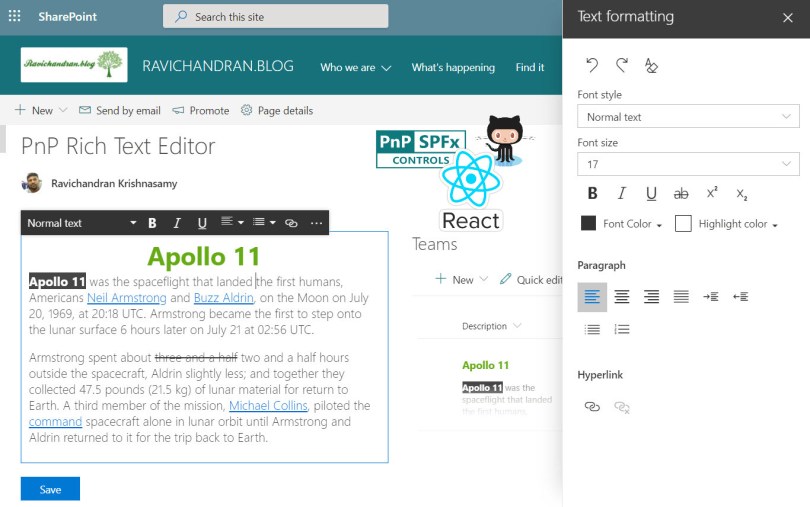

How to display html coming from list using this.
LikeLike
Hi Lokesh,
You don’t have to anything special for HTML content, you just have to pass the value in state, check this code file
https://github.com/ravichandran-blog/SPFx/blob/master/spfx-pnp-richtext/src/webparts/spfxPnpRichtext/components/SpfxPnpRichtext.tsx#L26
LikeLiked by 1 person
I am not seeing any “Rich text” editor after running gulp serve… I just see an uneditable box…
LikeLiked by 1 person
This is one of the popular control, you may missed something, make sure you set true for isEditMode
https://github.com/ravichandran-blog/SPFx/blob/master/spfx-pnp-richtext/src/webparts/spfxPnpRichtext/components/SpfxPnpRichtext.tsx#L27
also check this official documentation.
https://pnp.github.io/sp-dev-fx-controls-react/controls/RichText/
LikeLiked by 1 person
Hi. Can you please check your code. I’ve created this without errors and it only produces a thin box with only a Description Field. There is no Rich Text Control and no Save button displays
LikeLiked by 1 person
We have to place the save button make sure you have added isEditMode={true} in the RichText control, refer below code
https://github.com/ravichandran-blog/SPFx/blob/master/spfx-pnp-richtext/src/webparts/spfxPnpRichtext/components/SpfxPnpRichtext.tsx#L29
LikeLiked by 1 person
Hello Ravi,
Will this version of your code will work on SharePoint 2019 on Prem?
LikeLike
Yes, this code can work in both online and on premises
LikeLike
Will this PnP Rich Text Editor webpart can be used as property pane control in a custom SPFX webpart
LikeLike
You can use any control in the property pane, check this URL for more detail
LikeLike
Hello, Thanks for the great article.
Everything works fine. However, when I type inside the RichText editor, I loose focus. As if the component is re-rendering after updating the state.
Is there a workaround for this problem?
Thanks
LikeLike
Hi Bil
Could you please ensure that you followed the same procedure as I did here?
https://github.com/ravichandran-blog/SPFx/blob/master/spfx-pnp-richtext/src/webparts/spfxPnpRichtext/components/SpfxPnpRichtext.tsx
If you are still experiencing problems, please let me know and I will try to reproduce the problem on my end.
LikeLike
Thanks, Ravichandran, there was a difference in the onChange event, and now it works.
However, I sometimes notice the output of the RichText shows, and other times it doesn’t. I tried to delete the cache, still had random behavior.
Is it possible to share with you the source code and have a quick look? Thanks
LikeLike
Yes, you can post the code to GitHub and send me the URL so I can look it over when I have time.
LikeLike
What to check if we can change default font – family and size of text within richtext from properties. I want to add “Arial” as my default font for text in richtext.
LikeLike
Hi Rakesh,
Then you may need to clone the PnP Controls source code and customize it as you want.
LikeLike
Looks great, are you able to save the formatting and data, i,e. rich text value, and display?
LikeLike
Yes, you can refer to this code.
https://github.com/ravichandran-blog/SPFx/tree/master/spfx-pnp-richtext
LikeLike