As we know Office UI Fabric which is official front-end framework for building a user interface that fits seamlessly into SharePoint modern experience. In this article, we going to see more detail about the Date picker component. Also, we saving and retrieving data into the SharePoint list. Herewith you can find the complete project download link.

Creating a new SharePoint Framework web part
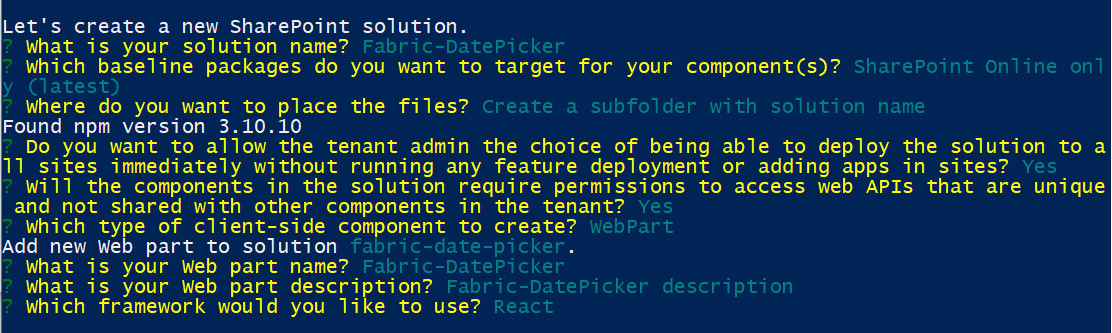
The first step we have to create new SharePoint framework web part project, I have used SharePoint Framework version 1.8, if you have any question for you then you can refer my one of the previous article where I explained simple steps to set up a new development environment and create the new project. While creating a project in the PowerShell you have to select react framework.
Important files
In the new SharePoint framework web part solution contains tons of files, understanding each file’s purpose is really awesome, but in this articale we going take look only four files, because making changes in those four files is enough
1. src\webparts\fabricDatePicker\FabricDatePickerWebPart.ts
2. src\webparts\fabricDatePicker\components\IFabricDatePickerProps.ts
3. src\webparts\fabricDatePicker\components\FabricDatePicker.tsx
4. src\webparts\fabricDatePicker\components\FabricDatePicker.module.scss
Web part TS file (FabricDatePickerWebPart.ts)
In this file, we just calling create react element and created element assigned to the react DOM, also we passing web part context as props so we can access this props in while create react component.
import * as React from 'react';
import * as ReactDom from 'react-dom';
import { BaseClientSideWebPart } from '@microsoft/sp-webpart-base';
import FabricDatePicker from './components/FabricDatePicker';
import { IFabricDatePickerProps, IFabricDatePickerWebpartProps } from './components/IFabricDatePickerProps';
export default class FabricPeoplePickerWebPart extends BaseClientSideWebPart<IFabricDatePickerWebpartProps> {
    public render(): void {
        const element: React.ReactElement<IFabricDatePickerProps> = React.createElement(
          FabricDatePicker,
            {
                spcontect: this.context
            }
        );
        ReactDom.render(element, this.domElement);
    }
}
Property file (IFabricDatePickerProps.ts)
In the props file we just created two interfaces, one is IFabricDatePickerProps will pass the props which are read-only, so we only passing context and another one is IFabricDatePickerWebpartProps will carry all states for the react components. so we can set and get values to the controls.
//Set all read only values
export interface IFabricDatePickerProps {
  spcontect?:any|null
}

//Set all read and write only values
export interface IFabricDatePickerWebpartProps {
  birthday?:any|null;
  message:string
}
Component file (FabricDatePicker.tsx)
In this file we do most of the things like building date picker, retiring data from SharePoint and assign that value to the date picker and save changes back into the SharePoint list.
In the constructor, we retrieve the value from SharePoint and assign the value to the date picker also we injecting props to the button click event for accessing all props inside the click event.
In the render event, we returning the HTML content for the user interface,
In the select date event, we receive the value and assign back to the component state
In the format date event, we can set which format date picker have to display the value,
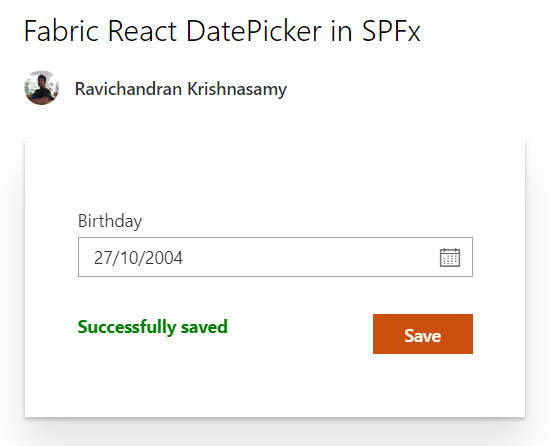
In the button click event, we updating value into the SharePoint list
import * as React from 'react';
import { IFabricDatePickerProps, IFabricDatePickerWebpartProps } from './IFabricDatePickerProps';
import { Environment, EnvironmentType } from '@microsoft/sp-core-library';
import { SPHttpClient, SPHttpClientResponse, ISPHttpClientOptions, IHttpClientOptions } from '@microsoft/sp-http'
import { DatePicker } from 'office-ui-fabric-react/lib/DatePicker';
import { Label } from 'office-ui-fabric-react/lib/Label';
import { PrimaryButton } from 'office-ui-fabric-react/lib/Button';
import styles from './FabricDatePicker.module.scss';

export default class FabricDatePicker extends React.Component<IFabricDatePickerProps, IFabricDatePickerWebpartProps> {

    private etag: String = undefined;
    public constructor(props: IFabricDatePickerProps, state: IFabricDatePickerWebpartProps) {
        super(props);
        this.state = {
            birthday: null,
            message:''
        };

        if (Environment.type === EnvironmentType.SharePoint) {
            this.props.spcontect.spHttpClient.get(this.props.spcontect.pageContext.web.absoluteUrl + '/_api/web/lists/getbytitle(\'sampleLIST\')/items(1)', SPHttpClient.configurations.v1).then
                ((Response: SPHttpClientResponse) => {
                   // this.etag = Response.headers.get('ETag');
                    Response.json().then((listItem: any) => {
                        this.setState({ birthday: new Date(listItem.Birthday) });
                    });
                });

        }
        else if (Environment.type === EnvironmentType.Local) {
            // return (<div>Whoops! you are using local host...</div>);
        }

        this._alertClicked = this._alertClicked.bind(this);
    }

    public render(): React.ReactElement<IFabricDatePickerProps> {
        return (
            <div className={styles.fabricDatePicker}>
                <div id="DivLocalHost"></div>
                <div className={styles.container}>
                    <div className={styles.row}>
                        <Label>Birthday</Label>
                        <DatePicker placeholder="Select a date..."
                            onSelectDate={this._onSelectDate}
                            value={this.state.birthday}
                            formatDate={this._onFormatDate}
                        />
                        <div>
                        <div className={styles.label}>
                        <label>{this.state.message}</label>
                        </div>
                        <div className={styles.button}>
                            <PrimaryButton data-automation-id="test"
                                text="Save"
                                onClick={this._alertClicked} />
                        </div>
                        </div>
                    </div>
                </div>
            </div>
        );

    }

    private _onSelectDate = (date: Date | null | undefined): void => {
        this.setState({ birthday: date });
    };

    private _onFormatDate = (date: Date): string => {
        return date.getDate() + '/' + (date.getMonth() + 1) + '/' + date.getFullYear();
    };

    private _alertClicked(): void {
        const body: string = JSON.stringify({
            '__metadata': {
                'type': 'SP.Data.SampleLISTListItem'
            },
            'Birthday': this.state.birthday
        });
        this.props.spcontect.spHttpClient.get(this.props.spcontect.pageContext.web.absoluteUrl + '/_api/web/lists/getbytitle(\'sampleLIST\')/items(1)', SPHttpClient.configurations.v1).then
        ((Response: SPHttpClientResponse) => {
          this.props.spcontect.spHttpClient.post(this.props.spcontect.pageContext.web.absoluteUrl + `/_api/web/lists/getbytitle('sampleLIST')/items(1)`,
          SPHttpClient.configurations.v1,
          {
              headers: {
                  'Accept': 'application/json;odata=nometadata',
                  'Content-type': 'application/json;odata=verbose',
                  'odata-version': '',
                  'IF-MATCH': Response.headers.get('ETag'),
                  'X-HTTP-Method': 'MERGE'
              },
              body: body
          }).then((response: SPHttpClientResponse) => {
              // Access properties of the response object.
              this.setState({ message: 'Successfully saved' });
              console.log(`Status code: ${response.status}`);
              console.log(`Status text: ${response.statusText}`);

              //response.json() returns a promise so you get access to the json in the resolve callback.
              response.json().then((responseJSON: JSON) => {
                  console.log(responseJSON);
              });
          });
        });

    }

}
Style file (FabricDatePicker.module.scss)
This file contains the CSS module, but we using sass because we wanted to call the CSS class name from javascript as a javascript object.
Date Picker properties
We can customize the date picker using date picker properties, you can find the many properties in the official documentation, here we take look some of them, by default date picker looks like this,

isMonthPickerVisible
this property by default is true, we can make false if we don’t need month picker in the calendar. example
<DatePicker placeholder="Select a date..." isMonthPickerVisible={false}/>

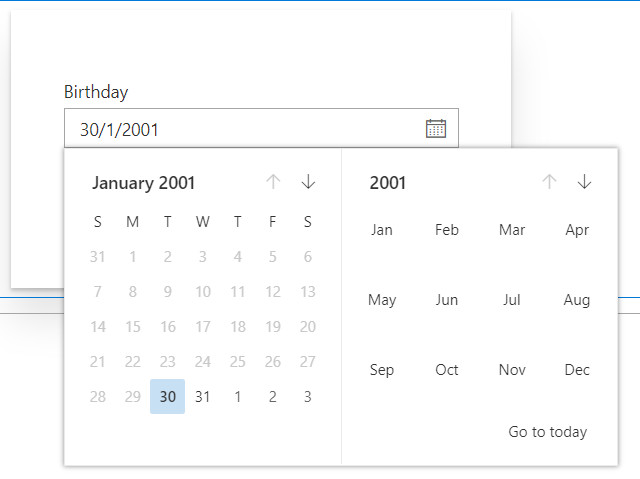
minDate
Using this property we can set the minimum date for the date picker, so date picker does not allow to chose less than that. Example
<DatePicker placeholder="Select a date..." minDate={new Date(2000,12,30)}/>
Please feel free to let me know if you have any queries in the comment section, I’m happy to help you!!
Source Code Download link
 https://code.msdn.microsoft.com/Fabric-React-DatePicker-in-d25382bb