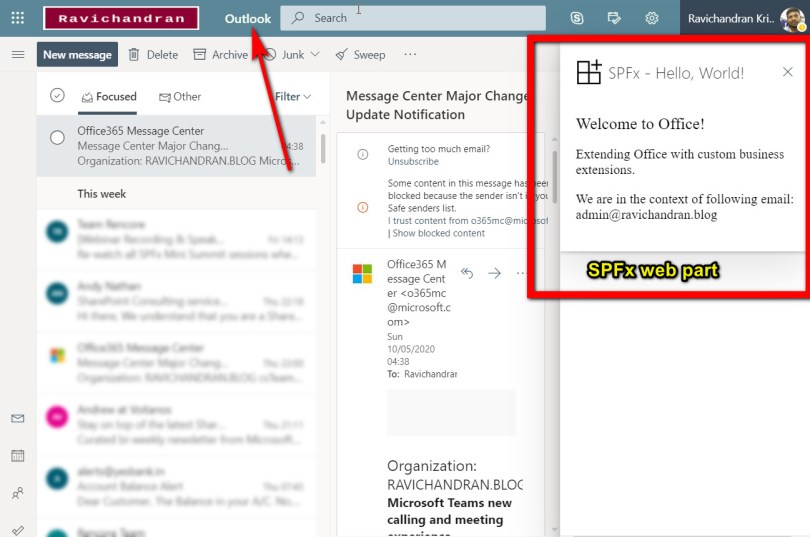
Building Office add-ins is possible using SharePoint Framework v1.10 and this is just a preview feature. So basically your web part has to hosted in the SharePoint and hosted web part can be accessed inside the Outlook web access. In the future, this web part can be accessible inside all the office web and desktop clients, but right now only available in Outlook web access. let we see the step by step instruction to building the Outlook add-in using SPFx,

Create a new web part project
Open power shell and run the following comment to create a new web part by running the Yeoman SharePoint Generator, have to add plusbeta for access the preview feature.
yo @microsoft/sharepoint --plusbeta
When prompted:
Enter the webpart name as your solution name, and then select Enter.
Select Create a subfolder with solution name for where to place the files.
Select Y to allow the solution to be deployed to all sites immediately.
Select N on the question if solution contains unique permissions.
Select WebPart as the client-side component type to be created.
The next set of prompts ask for specific information about your web part:
Enter your web part name, and then select Enter.
Enter your web part description, and then select Enter.
Accept the default No JavaScipt web framework option for the framework, and then select Enter.
Start Visual Studio Code (or your favorite code editor) within the context of the newly created project folder.
cd .\web part name\
code .
In the project root folder directory you can find the folder called officeAddin, in the folder, you can find one XML file, this file contains all the information regarding you SPFx web part integration information,
Install the Office JavaScript SDK using below npm command, this will provide the office context inside our web part
npm install @types/office-js --save-dev
In the \src\webparts\spfxOutlookHelloworld\SpfxOutlookHelloworldWebPart.ts file, we can access the office context in the render function. Office context allows us to do almost many things related to Outlook ,
import { BaseClientSideWebPart } from '@microsoft/sp-webpart-base';
import styles from './SpfxOutlookHelloworldWebPart.module.scss';
export default class SpfxOutlookHelloworldWebPart extends BaseClientSideWebPart<any> {
public render(): void {
let title: string = '';
let subTitle: string = '';
let contextDetail: string = '';
if (this.context.sdks.office) {
title = "Welcome to Office!";
subTitle = "Extending Office with custom business extensions.";
contextDetail = "We are in the context of following email: " + this.context.sdks.office.context.mailbox.userProfile.emailAddress;
}
else {
// We are rendered in normal SharePoint context
title = "Welcome to SharePoint!";
subTitle = "Customize SharePoint experiences using Web Parts.";
contextDetail = "We are in the context of following site: " + this.context.pageContext.web.title;
}
this.domElement.innerHTML = `
<div class="${ styles.spfxOutlookHelloworld}">
<div class="${ styles.container}">
<div class="${ styles.row}">
<div class="${ styles.column}">
<span class="${ styles.title}">${title}</span>
<p class="${ styles.subTitle}">${subTitle}</p>
<p class="${ styles.description}">${contextDetail}</p>
</div>
</div>
</div>
</div>`;
}
}
Deploy the solution in the SharePoint
You’re now ready to build, bundle, package, and deploy the solution.
Run the gulp commands to verify that the solution builds correctly.
gulp build
Use the following command to bundle and package the solution.
gulp bundle --ship
gulp package-solution --ship
Browse to the app catalog of your target tenant and upload the solution package. You can find the solution package under the sharepoint/solution folder of your solution. It is the .sppkg file. After you upload the solution package in the app catalog. you can find and the web part anywhere across the tenant.
Add web part in the Outlook web access
Navigate to the https://outlook.office.com/mail/ and select any one of the email, in the top right corner you can find the reply and forward option also you can three dots (…), in that menu click “Get Add-ins”

In the “Add-Ins for Outlook” popup select “My add-ins” on the left side then you can find the option called “+Add a custom Add-in” under Custom Add-ins section.

This will open one warning message, you can click Install to proceed the installation


Now you can find your add in the same mail menu from the three dots(…)


Sharing is caring!
If you have any questions, feel free to let me know in the comments section.
Happy coding!!!