Weather Add-In for SharePoint

SharePoint weather Add-In can be added on the SharePoint home page (dashboard),  this add-in automatically fetch geolocation from the browser. And based on the location it will retrieve the Temperature, humidity and wind speed etc… you can see the step by step instructions to develop this SharePoint Add-In. Also, the complete project source code is available for download,

Souce Code Download link,

https://code.msdn.microsoft.com/Weather-Add-In-for-9635e488
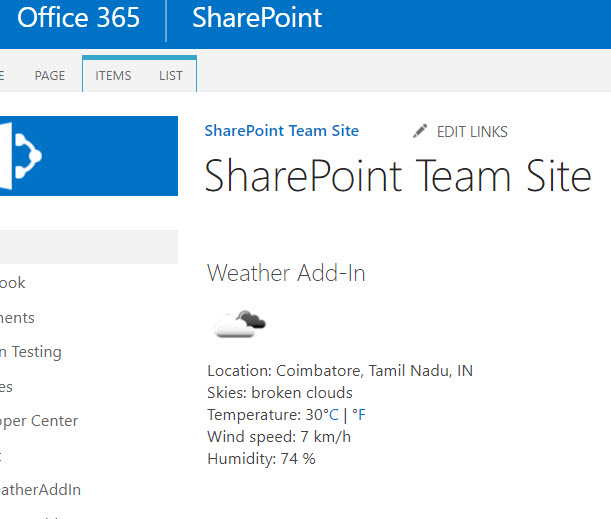
Weather AddIn

Create new Project in the Visual Studio using “App for SharePoint” template, here I’m using visual studio 2015 version. In the new project wizard select SharePoint-Hosted and rest you can select based on your requirements. The provider-hosted application can also be selected.

I have used the Local-weather GitHub project to implement this Add-In, In the project, you can find the script in the ASPX file.

Add new “Client Web Part (Host Web)” and select “Create a new app web page for the client web part content” (If you want this add-in in the Home page then we have to use new ASPX file instead of default one because it uses SharePoint master page), Edit newly created an ASPX page which is located in the Pages folder and replace with HTML which you find in my project.

        $(document).ready(function () {
            // get location from user's IP address
            $.getJSON('https://ipinfo.io', function (info) {
                var locString = info.loc.split(', ');
                var latitude = parseFloat(locString[0]);
                var longitude = parseFloat(locString[1]);
                $('#location').html('Location: ' + info.city + ', ' + info.region + ', ' + info.country)

                // get weather using OpenWeatherMap API
                $.getJSON('https://cors.5apps.com/?uri=http://api.openweathermap.org/data/2.5/weather?lat=' + latitude + '&lon=' + longitude + '&units=metric&APPID=c3e00c8860695fd6096fe32896042eda', function (data) {
                    var windSpeedkmh = Math.round(data.wind.speed * 3.6);
                    var Celsius = Math.round(data.main.temp)
                    var iconId = data.weather[0].icon;
                    var weatherURL = "http://openweathermap.org/img/w/" +
                            iconId + ".png";

                    var iconImg = "<img src='" + weatherURL + "'>";
                    $('#sky-image').html(iconImg);
                    $('#weather-id').html('Skies: ' + data.weather[0].description);

                    $('#temperature').html(Celsius);
                    $('#toFahrenheit').click(function () {
                        $('#temperature').html(Math.round((9 / 5) * Celsius + 32));
                        $('#wind-speed').html(Math.round(windSpeedkmh * 0.621) + ' mph')
                    })
                    $('#toCelsius').click(function () {
                        $('#temperature').html(Celsius);
                        $('#wind-speed').html(windSpeedkmh + ' km/hr')
                    })

                    $('#wind-speed').html(windSpeedkmh + ' km/h');
                    $('#humidity').html('Humidity: ' + data.main.humidity + ' %');

                })
            })
        })
<div class="row">
<div class="col-6">
<div id="sky-image"></div>
<div id="location"></div>
<div id="weather-id"></div>
<div>Temperature: <span id="temperature"></span>&deg<a href="#" id="toCelsius">C</a> | &deg<a href="#" id="toFahrenheit">F</a></div>
<div>Wind speed: <span id="wind-speed"></span></div>
<div id="humidity"></div>
</div>
</div>

Please feel free to let me know if you have any queries in the comment section, I’m happy to help you!!

Souce Code Download link

https://code.msdn.microsoft.com/Weather-Add-In-for-9635e488

3D Tag cloud links from SharePoint List

3D Tag cloud Add-In can be used on the SharePoint home page to show important links with cool animation, links are retrieved from the Sharepoint list. so users can easily update or add links. In the below, you can see the step by step instructions to develop this SharePoint Add-In. Also, the complete project source code is available for download,

Souce Code Download link

https://code.msdn.microsoft.com/3D-Tag-cloud-links-from-b5fe9220

3D cloud Tag

Create new Project in the Visual Studio using “App for SharePoint” template, here I’m using visual studio 2015 version. In the new project wizard select SharePoint-Hosted and rest you can select based on your requirements. The provider-hosted application can also be selected.

I have used jquery.svg3dtagcloud.min.js to implement this add-in and link data retrieved from SharePoint Links list, So in the SharePoint select “Add a new app” option and filter link, you can find the app called “Links” select that app and you can name whatever you want, I have named as 3DTags, so we don’t have to change anything on this list just directly start to add links on that list.

Links App

Links List

Also, we have to configure the permission on the AppManifest to access the SharePoint list with edit permission.

Add new “Client Web Part (Host Web)” and select “Create a new app web page for the client web part content” (If you want this add-in in the Home page then we have to use new ASPX file instead of default one because it uses SharePoint master page), Edit newly created an ASPX page which is located in the Pages folder and replace with HTML which you find in my project. Add below JS code in the app.js file.


'use strict';

ExecuteOrDelayUntilScriptLoaded(initializePage, "sp.js");

function initializePage()
{
var context = SP.ClientContext.get_current();

// This code runs when the DOM is ready and creates a context object which is needed to use the SharePoint object model
$(document).ready(function () {
getlinks();
});
var linkItems;
// This function prepares, loads, and then executes a SharePoint query to get the current users information
function getlinks() {
var website = context.get_site().get_rootWeb();
var linklist = website.get_lists().getByTitle("3DTags");
var camlQuery = new SP.CamlQuery();
linkItems = linklist.getItems(camlQuery);
context.load(linkItems);
context.executeQueryAsync(onGetLinkSuccess, onGetLinkFail);
}

// This function is executed if the above call is successful
// It replaces the contents of the 'message' element with the user name
function onGetLinkSuccess() {
var entries = [];
var linkEnumerator = linkItems.getEnumerator();
while (linkEnumerator.moveNext()) {
var oListItem = linkEnumerator.get_current();
entries.push({ label: oListItem.get_item('URL').get_description(), url: oListItem.get_item('URL').get_url(), target: '_top' })
}
var settings = {
entries: entries,
width: 480,
height: 480,
//width: '100%',
//height: '100%',
radius: '65%',
radiusMin: 75,
bgDraw: true,
bgColor: '#fff',
opacityOver: 1.00,
opacityOut: 0.05,
opacitySpeed: 6,
fov: 800,
speed: 2,
fontFamily: 'Oswald, Arial, sans-serif',
fontSize: '15px',
fontColor: '#111',
fontWeight: 'normal',
fontStyle: 'normal',
fontStretch: 'normal',
fontToUpperCase: true
};
$('#holder').svg3DTagCloud(settings);
}

// This function is executed if the above call fails
function onGetLinkFail(sender, args) {
console.log('Failed to get links. Error:' + args.get_message());
}
}

Please feel free to let me know if you have any queries in the comment section, I’m happy to help you!!

Souce Code Download link

174https://code.msdn.microsoft.com/3D-Tag-cloud-links-from-b5fe9220

Text to speech Add-In for SharePoint

Text to speech add-in can be used to speak text contents of the textarea in the SharePoint dashboard. Below you can see step by step instructions to develop this SharePoint Add-In. ,

SharePoint Text to Speak

Create new Project in the Visual Studio using “App for SharePoint” template, here I’m using visual studio 2015 version. In the new project wizard select SharePoint-Hosted and rest you can select based on your requirements. The provider-hosted application can also be selected.

I have used articulate.js to implement this add-in, you can find this JavaScript file in the project which is modified by me for fix some issues and some changes, and this JS file implemented using SpeechSynthesis, The SpeechSynthesis interface of the Web Speech API is the controller interface for the speech service;

Add new “Client Web Part (Host Web)” and select “Create a new app web page for the client web part content” (If you want this add-in in the Home page then we have to use new ASPX file instead of default one because it uses SharePoint master page), Edit newly created an ASPX page which is located in the Pages folder. Add below JavaScript code and HTML.

</div>
<div>

<%@ Page Language="C#" Inherits="Microsoft.SharePoint.WebPartPages.WebPartPage, Microsoft.SharePoint, Version=15.0.0.0, Culture=neutral, PublicKeyToken=71e9bce111e9429c" %>

<%@ Register TagPrefix="SharePoint" Namespace="Microsoft.SharePoint.WebControls" Assembly="Microsoft.SharePoint, Version=15.0.0.0, Culture=neutral, PublicKeyToken=71e9bce111e9429c" %>
<%@ Register TagPrefix="Utilities" Namespace="Microsoft.SharePoint.Utilities" Assembly="Microsoft.SharePoint, Version=15.0.0.0, Culture=neutral, PublicKeyToken=71e9bce111e9429c" %>
<%@ Register TagPrefix="WebPartPages" Namespace="Microsoft.SharePoint.WebPartPages" Assembly="Microsoft.SharePoint, Version=15.0.0.0, Culture=neutral, PublicKeyToken=71e9bce111e9429c" %>

<WebPartPages:AllowFraming ID="AllowFraming" runat="server" />

<html>
<head>
<title></title>

<script type="text/javascript" src="../Scripts/jquery-1.9.1.min.js"></script>
<script type="text/javascript" src="/_layouts/15/MicrosoftAjax.js"></script>
<script type="text/javascript" src="/_layouts/15/sp.runtime.js"></script>
<script type="text/javascript" src="/_layouts/15/sp.js"></script>
<script type="text/javascript" src="../Scripts/articulate.js"></script>
<script type="text/javascript">
// Set the style of the client web part page to be consistent with the host web.
(function () {
'use strict';

var hostUrl = '';
if (document.URL.indexOf('?') != -1) {
var params = document.URL.split('?')[1].split('&');
for (var i = 0; i < params.length; i++) {
var p = decodeURIComponent(params[i]);
if (/^SPHostUrl=/i.test(p)) {
hostUrl = p.split('=')[1];
document.write('	<link rel="stylesheet" href="' + hostUrl + '/_layouts/15/defaultcss.ashx" />');
break;
}
}
}
if (hostUrl == '') {
document.write('	<link rel="stylesheet" href="/_layouts/15/1033/styles/themable/corev15.css" />');
}
})();

</script>
</head>
<body>
<textarea id="texttospeck" style="height:200px;width:500px"></textarea>

<input type="button" id="btnSpeak" onclick="javascript: $('#texttospeck').articulate('speak');" value="Speak" />
<input type="button" id="btnPause" onclick="javascript: $('#texttospeck').articulate('pause');" value="Pause" />
<input type="button" id="btnResume" onclick="javascript: $('#texttospeck').articulate('resume');" value="Resume" />
<input type="button" id="btnStop" onclick="javascript: $('#texttospeck').articulate('stop');" value="Stop" />
</body>
</html>

</div>
<div>

Please feel free to let me know if you have any queries in the comment section, I’m happy to help you!!