Azure Translator in SPFx

This article provides steps to implement the Azure translation in the SharePoint Framework (SPFx) web part, generally, Azure translate is translating text in real-time across more than 60 languages, powered by the latest innovations in machine translation. Support a wide range of use cases, such as translation for call centers, multilingual conversational agents, or in-app communication.

You can create a free trial to access this Azure Cognitive Services, click this link to navigate and check more details about this translate service

Create a new web part project

Open power shell and run following comment to create a new web part by running the Yeoman SharePoint Generator

yo @microsoft/sharepoint

When prompted:

Enter the webpart name as your solution name, and then select Enter.
Select Create a subfolder with solution name for where to place the files.
Select Y to allow the solution to be deployed to all sites immediately.
Select N on the question if solution contains unique permissions.
Select WebPart as the client-side component type to be created.

The next set of prompts ask for specific information about your web part:

Enter your web part name, and then select Enter.
Enter your web part description, and then select Enter.
Select React framework as the framework you would like to use, and then select Enter.

Start Visual Studio Code (or your favorite code editor) within the context of the newly created project folder.

cd .\web part name\
code .

Install the library and required dependencies

npm install jquery

Update the react component

Import the npm translate module in the src\webparts\spfxAzureTranslator\components\SpfxAzureTranslator.tsx also, you have to get the Azure API secret key from Azure to use this service.

import * as React from 'react';
import styles from './SpfxAzureTranslator.module.scss';
import { ISpfxAzureTranslatorProps } from './ISpfxAzureTranslatorProps';
import { ISpfxAzureTranslatorState } from './ISpfxAzureTranslatorState';
import { Stack, IStackProps, IStackStyles } from 'office-ui-fabric-react/lib/Stack';
import { TextField } from 'office-ui-fabric-react/lib/TextField';
import { IDropdownOption, Dropdown } from 'office-ui-fabric-react';
import $ from "jquery";


const stackStyles: Partial<IStackStyles> = { root: { width: 650 } };
const stackTokens = { childrenGap: 50 };
const columnProps: Partial<IStackProps> = {
  tokens: { childrenGap: 15 },
  styles: { root: { width: 300 } },
};
const smallcolumnProps: Partial<IStackProps> = {
  tokens: { childrenGap: 15 },
  styles: { root: { width: 180 } },
};

export default class SpfxAzureTranslator extends React.Component<ISpfxAzureTranslatorProps, ISpfxAzureTranslatorState> {
  constructor(props: ISpfxAzureTranslatorProps, state: ISpfxAzureTranslatorState) {
    super(props);
    this.state = ({ toLanguage: '', content: '', userinput: '', langarr: [] })
    this._getSupportedLangualge();
  }

  private async _getSupportedLangualge() {
    $.get({
      url: 'https://api.cognitive.microsofttranslator.com/languages?api-version=3.0&scope=translation'
    })
      .done((languages: any): void => {
        let droparr: IDropdownOption[] = []
        let langobjs = languages.translation;
        for (var key in langobjs) {
          if (langobjs.hasOwnProperty(key)) {
            droparr.push({ key: key, text: langobjs[key].name })
          }
        }
        this.setState({ langarr: droparr })
      }).fail(function (res) {
        console.log(res);
      });
  }

  private async _translate() {
    $.post({
      url: 'https://ravichandran.cognitiveservices.azure.com/sts/v1.0/issueToken',
      headers: {
        'Ocp-Apim-Subscription-Key': '03e88fd1d1cc403654861c891001e457',
        'Authorization': 'ravichandran.cognitiveservices.azure.com'
      }
    })
      .done((tocken: any): void => {
        $.post({
          url: 'https://api.cognitive.microsofttranslator.com/translate?api-version=3.0&to=' + this.state.toLanguage,
          headers: {
            'Ocp-Apim-Subscription-Key': '03e88fd1d1cc403654861c891001e457',
            'Authorization': 'Bearer ' + tocken,
            'Content-Type': 'application/json'
          },
          data: JSON.stringify([{ "Text": this.state.userinput }])
        })
          .done((result: any): void => {
            console.log(result);
            this.setState({ content: result[0].translations[0].text })
          }).fail(function (res) {
            console.log(res);
          });

      }).fail(function (res) {
        console.log(res);
      });
  }

  public render(): React.ReactElement<ISpfxAzureTranslatorProps> {
    return (
      <div className={styles.spfxAzureTranslator}>
        <Stack horizontal tokens={stackTokens} styles={stackStyles}>
          <Stack {...columnProps}>
            <TextField label="Any language (auto deducted)" multiline autoAdjustHeight onChanged={(newtext) => { this.setState({ userinput: newtext }); this._translate() }} />
          </Stack>
          <Stack {...smallcolumnProps}>
            <Dropdown
              placeholder="Select a language"
              label="Select Language"
              options={this.state.langarr}
              onChanged={(value) => { this.setState({ toLanguage: value.key.toString() }); this._translate() }}
            />
          </Stack>
          <Stack {...columnProps}>
            <label>{this.state.content}</label>
          </Stack>
        </Stack>
      </div>
    );
  }
}

Deploy the solution

You’re now ready to build, bundle, package, and deploy the solution.

Run the gulp commands to verify that the solution builds correctly.

gulp build

Use the following command to bundle and package the solution.

gulp bundle --ship
gulp package-solution --ship

Browse to the app catalog of your target tenant and upload the solution package. You can find the solution package under the sharepoint/solution folder of your solution. It is the .sppkg file. After you upload the solution package in the app catalog. you can find and the web part anywhere across the tenant.

Sharing is caring!

If you have any questions, feel free to let me know in the comments section.
Happy coding!!!

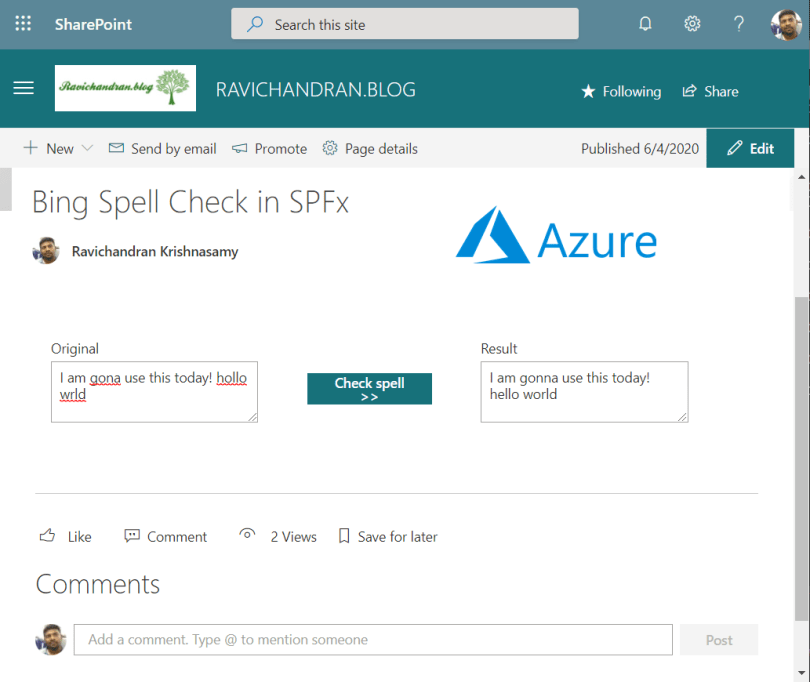
Bing Spell Check in SPFx

This article provides steps to implement the spell check functionality using Azure Cognitive Services of Bing Spell Check in the SharePoint Framework (SPFx) web part, this is very useful feature also you can get this service free if your usage is less, if you want to know the more details please this Bing Spell Check page

Create a new web part project

Open power shell and run following comment to create a new web part by running the Yeoman SharePoint Generator

yo @microsoft/sharepoint

When prompted:

Enter the webpart name as your solution name, and then select Enter.
Select Create a subfolder with solution name for where to place the files.
Select Y to allow the solution to be deployed to all sites immediately.
Select N on the question if solution contains unique permissions.
Select WebPart as the client-side component type to be created.

The next set of prompts ask for specific information about your web part:

Enter your web part name, and then select Enter.
Enter your web part description, and then select Enter.
Select React framework as the framework you would like to use, and then select Enter.

Start Visual Studio Code (or your favorite code editor) within the context of the newly created project folder.

cd .\web part name\
code .

Configure the custom properties

Create a new source code file under the src\webparts\<web part name>\components\ folder of the solution. Call the new file I<web part name>State.ts and use it to create a TypeScript Interface

export interface ISpfxAzureBingspellcheckState {
  content: string;
  processedcontnet: string;
}

Update the <web part name>.tsx file. First, add some import statements to import the types you defined earlier. Notice the import for I<web part name>Props and I<web part name>State. There are also some imports for the PnP components used to render the UI of the PnP React component and pnp sp imports.

import * as React from 'react';
import styles from './SpfxAzureBingspellcheck.module.scss';
import { ISpfxAzureBingspellcheckProps } from './ISpfxAzureBingspellcheckProps';
import { ISpfxAzureBingspellcheckState } from './ISpfxAzureBingspellcheckState';
import { Stack, IStackProps, IStackStyles } from 'office-ui-fabric-react/lib/Stack';
import { TextField } from 'office-ui-fabric-react/lib/TextField';
import { PrimaryButton } from 'office-ui-fabric-react/lib/Button';
import { autobind } from 'office-ui-fabric-react/lib/Utilities';

next to the imports, added some stack properties

const stackStyles: Partial<IStackStyles> = { root: { width: 650 } };
const stackTokens = { childrenGap: 50 };
const columnProps: Partial<IStackProps> = {
  tokens: { childrenGap: 15 },
  styles: { root: { width: 300 } },
};
const smallcolumnProps: Partial<IStackProps> = {
  tokens: { childrenGap: 15 },
  styles: { root: { width: 180 } },
};

Replace this render function with the following code.

  public render(): React.ReactElement<ISpfxAzureBingspellcheckProps> {
    return (
      <div className={styles.spfxAzureBingspellcheck}>
        <Stack horizontal tokens={stackTokens} styles={stackStyles}>
          <Stack {...columnProps}>
            <TextField label="Original" multiline autoAdjustHeight onChanged={(newtext) => this.setState({ content: newtext })} />
          </Stack>
          <Stack {...smallcolumnProps}>
            <PrimaryButton className={styles.button} text="Check spell >>" onClick={this._processClicked} />
          </Stack>
          <Stack {...columnProps}>
            <TextField label="Result" value={this.state.processedcontnet} multiline autoAdjustHeight />
          </Stack>
        </Stack>
      </div >
    );
  }

Update the React component type declaration and add a constructor, as shown in the following example.

export default class SpfxAzureBingspellcheck extends React.Component<ISpfxAzureBingspellcheckProps, ISpfxAzureBingspellcheckState> {
  constructor(props: ISpfxAzureBingspellcheckProps, state: ISpfxAzureBingspellcheckState) {
    super(props);
    this.state = ({ content: '', processedcontnet: '' });
  }

Add below function inside the react component to access and get the result from Azure Cognitive Bing Spell Check Services

  @autobind
  private _processClicked(): void {
    this.getSpellcheckedContent();
  }
  @autobind
  private async getSpellcheckedContent() {
    let text = this.state.content;
    if (text !== '') {
      let response = await fetch('https://api.cognitive.microsoft.com/bing/v7.0/spellcheck?text=' + text + '&mkt=en-US&mode=spell', {
        method: 'POST',
        headers: {
          'Content-Type': 'application/x-www-form-urlencoded;charset=UTF-8',
          'Ocp-Apim-Subscription-Key': '<ENTER-KEY-HERE>',
          'Content-Length': (text.length + 5) + ''
        },
        body: ''
      });
      let jresponse = await response.json();
      console.log(jresponse)
      jresponse.flaggedTokens.forEach(word => {
        text = text.replace(word.token, word.suggestions[0].suggestion);
      });
      this.setState({ processedcontnet: text })
    }
  }

Deploy the solution

You’re now ready to build, bundle, package, and deploy the solution.

Run the gulp commands to verify that the solution builds correctly.

gulp build

Use the following command to bundle and package the solution.

gulp bundle --ship
gulp package-solution --ship

Browse to the app catalog of your target tenant and upload the solution package. You can find the solution package under the sharepoint/solution folder of your solution. It is the .sppkg file. After you upload the solution package in the app catalog. you can find and the web part anywhere across the tenant.

Sharing is caring!

If you have any questions, feel free to let me know in the comments section.
Happy coding!!!

Track SPFx logs using PnP Logging and Azure Application Insights

This article provides steps to implement logging functionality using PnP Logging module and Azure Application Insights in the SharePoint Framework (SPFx) web part. Generally, The logging module provides a lightweight subscribable and extensible logging framework. In this article, we storing logs into the Azure Application Insights.

Create a new web part project

Open power shell and run following comment to create a new web part by running the Yeoman SharePoint Generator

yo @microsoft/sharepoint

When prompted:

Enter the webpart name as your solution name, and then select Enter.
Select Create a subfolder with solution name for where to place the files.
Select Y to allow the solution to be deployed to all sites immediately.
Select N on the question if solution contains unique permissions.
Select WebPart as the client-side component type to be created.

The next set of prompts ask for specific information about your web part:

Enter your web part name, and then select Enter.
Enter your web part description, and then select Enter.
Select React framework as the framework you would like to use, and then select Enter.

Start Visual Studio Code (or your favorite code editor) within the context of the newly created project folder.

cd .\web part name\
code .

Install the library and required dependencies

npm install @pnp/logging --save
npm i @microsoft/applicationinsights-react-js
npm i @microsoft/applicationinsights-web

Related articles : Basics of PnP Logging in SPFx

Custom Listener

We have created one custom listener, in this file we imported required dependencies and initialized the Application Insights, while initialization we have to pass the Instrumentation Key. this key can be found in the Application Insights overview page. navigate to this page to create new Application Insights.

import { SeverityLevel } from '@microsoft/applicationinsights-web';
import { ApplicationInsights } from '@microsoft/applicationinsights-web'
import { ReactPlugin } from '@microsoft/applicationinsights-react-js'
import { globalHistory } from "@reach/router"
import {
    ILogEntry,
    ILogListener,
    LogLevel
} from "@pnp/logging";

class CustomListener implements ILogListener {
    private appInsights: ApplicationInsights;
    constructor() {
        this.appInsights = this.getApplicationInsights()
    }

    log(entry: ILogEntry): void {
        if (entry.level == LogLevel.Error)
            this.appInsights.trackException({ error: new Error(entry.message), 
severityLevel: SeverityLevel.Error });
        else if (entry.level == LogLevel.Warning)
            this.appInsights.trackException({ error: new Error(entry.message), 
severityLevel: SeverityLevel.Warning });
        else if (entry.level == LogLevel.Info)
            this.appInsights.trackException({ error: new Error(entry.message), 
severityLevel: SeverityLevel.Information });
        else
            this.appInsights.trackException({ error: new Error(entry.message), 
severityLevel: SeverityLevel.Verbose });
    }

    private getApplicationInsights(): ApplicationInsights {
        const reactPlugin = new ReactPlugin();
        const applicationInsights = new ApplicationInsights({
            config: {
                instrumentationKey: 'YOUR_INSTRUMENTATION_KEY_GOES_HERE',
                extensions: [reactPlugin],
                extensionConfig: {
                    [reactPlugin.identifier]: { history: globalHistory }
                }
            }
        })
        applicationInsights.loadAppInsights()
        return applicationInsights;
    }
}

export default CustomListener;

Client side web part class

We have to import and subscribe the logging in the client-side web part class we can access this logging feature in any of your react component. in the below code we have to import and subscribing our Custom Listener,   

import * as React from 'react';
import * as ReactDom from 'react-dom';
import { BaseClientSideWebPart } from '@microsoft/sp-webpart-base';
import SpfxPnpLoggingAzure from './components/SpfxPnpLoggingAzure';
import {
  Logger,
  ConsoleListener,
  LogLevel
} from "@pnp/logging";
import CustomListener from './components/CustomListener';

export default class SpfxPnpLoggingAzureWebPart extends BaseClientSideWebPart<{}> {

  public onInit(): Promise<void> {
    Logger.activeLogLevel = LogLevel.Info;
    Logger.subscribe(new ConsoleListener());
    Logger.subscribe(new CustomListener());
    return Promise.resolve<void>();
  }

  public render(): void {
    const element: React.ReactElement<{}> = React.createElement(SpfxPnpLoggingAzure);
    ReactDom.render(element, this.domElement);
  }
}

React Component Class

In the react component class file we have triggered some of the log messages to the logger

import * as React from 'react';
import styles from './SpfxPnpLoggingAzure.module.scss';
import { PrimaryButton } from 'office-ui-fabric-react/lib/Button';

import {
  Logger,
  LogLevel
} from "@pnp/logging";

export default class SpfxPnpLoggingAzure extends React.Component<{}, {}> {
  public render(): React.ReactElement<{}> {
    return (
      <div className={ styles.spfxPnpLoggingAzure }>
       <PrimaryButton onClick={this.btnclicked} text="Trigger"></PrimaryButton>
      </div>
    );
  }

  private btnclicked() {
    Logger.write("This information triggerd from react component");
    Logger.write("This warning triggerd from react component", LogLevel.Warning);
    Logger.write("This error triggerd from react component", LogLevel.Error);
    Logger.writeJSON({ FirstName: "Ravichandran", LastName: "Krishnasamy" }, LogLevel.Info);
  }
}

Deploy the solution

You’re now ready to build, bundle, package, and deploy the solution.

Run the gulp commands to verify that the solution builds correctly.

gulp build

Use the following command to bundle and package the solution.

gulp bundle --ship
gulp package-solution --ship

Browse to the app catalog of your target tenant and upload the solution package. You can find the solution package under the sharepoint/solution folder of your solution. It is the .sppkg file. After you upload the solution package in the app catalog. you can find and the web part anywhere across the tenant.

Sharing is caring!

If you have any questions, feel free to let me know in the comments section.
Happy coding!!!