This post will explain about creating new master page for SharePoint Online, same logic is applicable for SharePoint 2013 and 2016.
There are various ways we can create custom master page for SharePoint, here I’m going to convert bootstrap HTML template to SharePoint mater page, hope you know that the bootstrap templates can change design based on the screen size, so these templates design are called responsive design.


You can download any HTML template from web; you will can zipped file then extract all files,

Navigate to SharePoint admin center https://<tenant name>-admin.sharepoint.com
In the site collection tab click new and select Private or Public site collection
 Fill all the required details and select Publishing Portal template under Publishing tab

Once the site collection is created, open the site in the browser and SharePoint Designer 2013.
Once site is opened in the SharePoint Designer 2013, navigate to All files _catalogs masterpage

And copy and paste all the downloaded html template files like image, css, script folders and HTML file etc,.
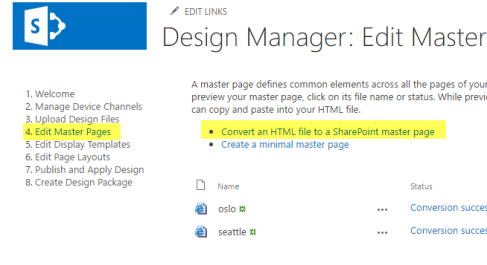
Go back to the browser and click the gear button which is located on top right of the SharePoint page and select Design Manager.

On the design manager click edit master pages and click “Convert an HTML file to a SharePoint master page”
On the dialog popup select you pasted HTML page and click Insert
now open SharePoint designer 2013 and find the newly created master page, you can find two files, in that edit the HTML extension and remove the center content(layout section contents) and find below highlighted code and cut and paste into the layout section.

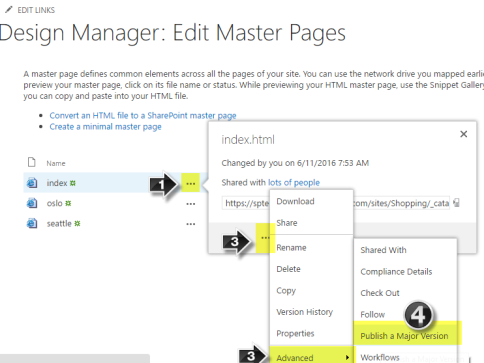
Then publish the newly added master page in Design Manager or SharePoint design manager
After publishing, go to the site settings and click master pages link under look on feel, select newly added master page in site master page drop down list and click OK to apply the new master page.

And to finish it off you will need to create a page layout and we are done!!
To create the page layout for the center content please click the below link and go ahead.
Please feel free to let me know if you have any queries in the comments section,I’m happy to help you!!
Happy coding!!

[…] check my previous post about create custom master page for SharePoint Navigate SharePoint design manager and click Edit Page Layout link then click Create a page layout, in the popup enter new layout name and select master page and select existing SharePoint default content type or create new content type based on your requirement, you can find the create new content type link on the same popup. […]
LikeLike
hy,
I create a template (layout page ) with sharepoint, but when I add a new page does not propose me my template !! can you help me please ! thanks
LikeLike
Hi Nana,
You have to add page layout for that particuler web in “Settings –> Page layouts and site templates”
https://<>/_layouts/15/AreaTemplateSettings.aspx
Let me know if you need anymore help.
Thanks
LikeLike
Hi Ravi ..your blog was really helpful. I’m basically a SharePoint developer and tasked to SharePoint Online branding. I followed the same steps. I am able to make a new master page. Howerver, at the bottom of page I am still getting the default publishing page.
I posted the question on social msdn forum about the same. https://social.msdn.microsoft.com/Forums/office/en-US/c5832af3-d8bc-47bf-a372-da6f9489fb71/sharepoint-online-branding?forum=sharepointdevelopment
Can you please advise?
Wishing you a very happy and prosperous new year 2017!!! :)
LikeLike
Hi Aroh,
Happy new year!
You have to create new page layout using your custom master page, check my another artical (Part-2) for step by step instration,
https://ravichandran.blog/2016/06/12/create-custom-page-layout-for-sharepoint-online/
Let me know if you have any quries.
Thanks
LikeLike
can we create a master page for the team site
LikeLike
yes, we can for that we have to activate these two features “SharePoint Server Publishing Infrastructure” and “SharePoint Server Publishing”
Check this link before you turn on those features
https://sharepoint.stackexchange.com/questions/214425/what-happens-when-i-enable-sharepoint-server-publishing-sharepoint-server-publ
LikeLike
Thanks for your step by step in creating masterpage using html extensions.
Greetings.
LikeLiked by 1 person
Hi Ravichandran,
Thanks You for master page creation explanation..
LikeLike